The Top 3 Things To Help Low Back Pain
How To Strengthen Your Low Back
It’s all very well getting out of pain, getting back to doing what you love- long walks with the dogs, light jogging, chucking the kids around and being pain free at work.
But there is a nagging doubt in the back of your head that is telling you to ‘be careful, your back may GO’.
So how do we get rid of the worry and increase the confidence in your back?
Only 15% of patients recovering from a musculo-skeletal injury will carry on the exercises past the four-week mark from their last appointment. To make a physiological change in the body it does take twenty-eight days, to sustain, it can take almost a year, depending on the nature and degree of the injury. It’s so important to keep training and improving your back health.
The first three exercises here come from Professor McGill who is an expert in biomechanics. He has worked with professional athletes and many Olympic rowers to understand more about the biomechanics behind the spine, to try and improve function and movement. These exercises work for pro athletes and can work for us as well. They are very simple to implement and can be done on the living room floor as soon as today (McGill, 2015).
How to prevent back pain coming back
- Curl Up – this is a modification of a sit up. A sit up is a major mistake a lot of our clients make. They are very bad for your spine in that they compress the bottom disc and put pressure through the base of the spine when it is flexed over to bring the torso towards the knees. They have now been taken out of Marine training in the USA, as they were causing too many back issues. So if the Marines aren’t doing them because they cause too many issues then we certainly can’t do them (McGill, 2015).
The Curl Up is a safe alternative to a sit-up and doesn’t flex the torso all the way over the base of the spine. It maintains the neutral spine and keeps the integrity in the discs whilst building strength in the core and transversus abdominis. This is the muscle that runs from the front of the tummy round into the back and pelvis. It acts like a brace but a natural one.
The exercise is started lying on your back, the hands by the side to start with. Slowly flex the knees and draw the heels towards the buttocks and keep them at 45 degrees. The next step is to put the hands underneath the back in the low spine where there is a gap. You should feel the gap reduce when the exercise is initiated, and this will mean you have complete core contraction.
Very slowly, whilst keeping the neck in a neutral position (not jutting the chin out, or looking all the way up), you want to bring the shoulders and head off the floor, feeling the contraction of the lower abdomen and tummy muscles. Keep this contraction going as you slowly lower the shoulders and head down to the floor. Rest the neck down, contract the abdomen and raise up again. This raising and lowering is one repetition. It seems too easy right? Well, truth is that it is in theory, but in practice, to actually recruit the right muscles is harder. So, you will know you have done it correctly once you start to feel the lower abdomen and stomach working.
Repeat this 10 times for 3 sets. If you feel any pain in the neck or in the legs, stop. Don’t do any exercise if you feel it is making anything worse.
VIDEO LINK: https://youtu.be/DtbET9HL33g
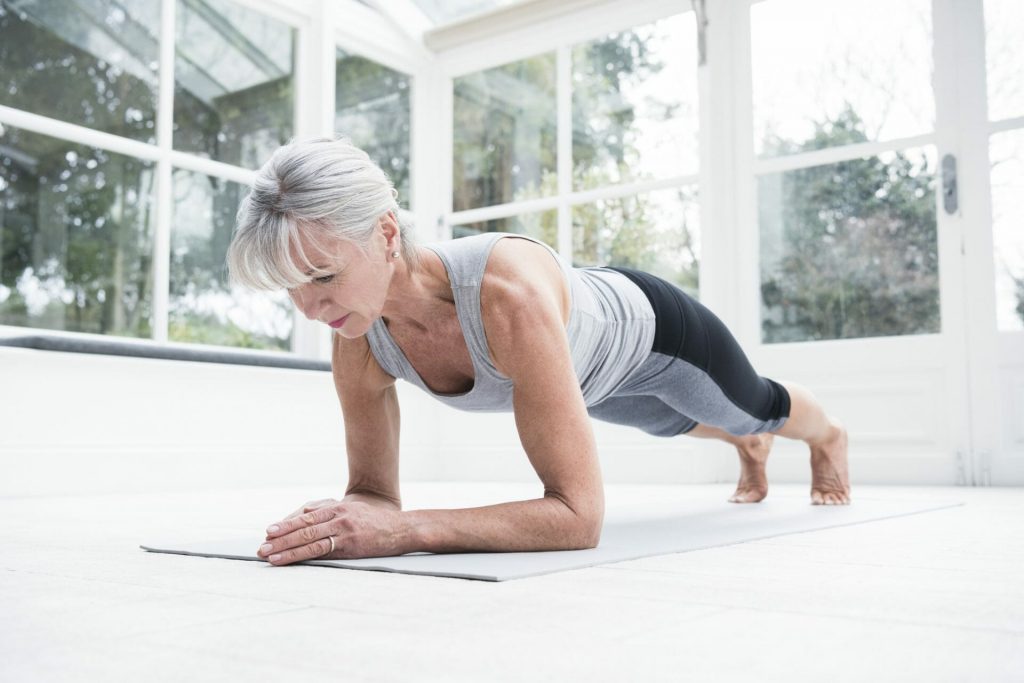
- Side Plank – the second exercise in the McGill series is harder than you would expect but still has steps and modifications along the way that you can take to make it easier or harder as you get stronger in the core and spine. It is designed to strengthen the muscles on the side of the core called the obliques, these are diagonal shaped muscles that run into the pelvis and low back. When we side bend or twist, these will prevent anything from becoming unstable from the side position (McGill, 2015).
A lot of the time our clients will describe having a problem of bending down to pick something up off the floor, and then when getting back up they felt the back go. This can often be due to weak obliques. They are often not strong enough and don’t provide enough support. This is a key muscle to get working optimally.
To start this, lie on your side, your hips level with your torso, so not rotating back or forwards. The elbow is on the ground and propped up at 90 degrees, so you are putting your weight through the elbow. If you have started on your left side, then your left hip will be touching the floor. You want to very slowly contract the left side and feel the muscles tighten from your armpit all the way down to your hip.
Bringing the hip off the floor, you will feel pressure on your shoulder and on the left side of the torso, this is good, you shouldn’t feel tension in the back. Then slowly lower the hip back down. At this point, the legs haven’t moved, they will be bent at 45 degrees and the hip does all the work.
Repeat this 10 times, 3 sets. This may be too easy, and you aren’t feeling it in the side muscles, as you are not putting enough weight through them. So, the next step is to straighten the legs out, putting one foot in front of the other. And then initiate the contraction again but raising the hip and the knee off the floor so all the weight goes through the feet and the shoulder. These are the only two contact points. This is much harder and will generate more strength quicker in the lateral core.
Some teething issues will be pain in the shoulder. Make sure the shoulder is in line with the rest of the body, not too far forwards or rotated backwards. Another issue is pain in the knee. Again, this can be a torsion issue, so ensure that you aren’t rolling forwards, or get someone to watch and make sure there is a straight line from the head to the feet.
With the harder version, you may want to reduce the repetitions that you are doing, so start with 5 and build up to 10 again once feeling comfortable.
VIDEO LINK: https://youtu.be/-cPZejJvaYg
- Bird Dog – this is the third exercise in the McGill series and is the hardest (always leave the hardest to last). This exercise increases stability in the low back. A lot of the time we hear clients say “I just bent down and my back went” or “I just leant to open the window and I dropped to the floor.” This is because of a build-up in instability, whether it’s in the low back or the pelvis. The ligaments and muscles have a lack of control and cannot support the spine. Over time, they will gradually lose more stability, and as the disc or spinal column will take more load, the body can compensate for this change in load. Until it says enough is enough and can’t take the stress on the disc or a delicate structure in the back and will lock everything down to protect it. This could be a spasm and build up of inflammation, and it means you can’t move effectively, but it protects the integral structures (McGill, 2015).
What this exercise does is ensure that doesn’t happen, it activates and stabilises the ligaments and muscles in the spine. This ensures that the discs and spinal column don’t take up extra weight and limits the chance of a spasm occurring.
People with knee pain may struggle with this, as you need to start on all fours. Try it in bed to start with, if that doesn’t work, then see the exercise below; it’s similar but on the back. It doesn’t offer as much stability control but is a great exercise for increasing strength of the core and natural brace.
The beginning of the bird dog is vital. You need to start on all fours with the shoulders over the wrists. Get comfortable and find the ‘neutral spine’. What on earth is the neutral spine?
You will tip the hips back and forwards similar to the happy cat exercise above but keep the ribs still. Once you have gone back and forwards several times, then find the ‘middle’ of those two positions, pull the tummy in and squeeze the bum.
- First progression is just using the arms, so keeping the torso and hips completely still, just lengthen one arm out in front and come back, then lengthen the other arm and repeat 5 times on each side. All the time keeping the contraction of the tummy and bum muscles and not letting the hips rock from side to side when lifting the arm forwards.
- Second progression is just using the legs, a little harder as these are heavier. Keeping the tummy tight, squeeze the buttock muscles and lift and extend one leg back, hold it and then do the other one.
- Third Progression is using both the arms and legs. Don’t move to this stage until you feel comfortable with a and b. You need to ensure you are not rocking from side to side and you have one long spine that isn’t twisted or moving around. At the same time, lift the left leg and the right arm and extend them both, then return to the original resting position and repeat with the right leg and left arm, so you are working opposites. This increases the fascial tension across the body, so you essentially have two slings that are pulling the body into a good position and supporting your spine.
The ‘slings’ are vital because when you bend and twist, they will provide enormous support and prevent stress in the spine.
Repeat on each side 5 times, really slowly. Each repetition should take at least 5 seconds. Do 3 sets total.
VIDEO LINK: https://www.youtube.com/watch?v=jmVMUVbYqQI
Offer: Book an initial consultation, posture analysis and treatment for £45, usually £160 >
When to start doing back exercises?
You don’t want to do these exercises when in pain, wait until you are feeling better to being strengthening.
If you would like to have a chat with us contact us here >